This guide explores how to integrate iMotions with E-Prime, Psychtoolbox, and PsychoPy, three powerful tools for behavioral research. Learn how to streamline your experiment setup, collect biometric data, and troubleshoot common issues. Follow best practices to maximize data accuracy and optimize your research workflow with these software solutions.
Table of Contents
One of the cornerstones of the iMotions software is the ability to present stimuli to your respondents and at the same time measure their psychophysiological responses.
Our built-in stimulus presentation engine allows users to easily design sophisticated studies with various types of stimuli such as videos, audio, images, and websites. The software keeps the biometric data in synchrony with the stimulus presentation, which makes it easy to extract different types of metrics from eye-tracking on a stimulus-to-stimulus basis etc.
Although the iMotions stimulus presentation engine is quite versatile, we do from time to time get requests from clients who want to use external stimulus presentation tools for various reasons. One reason could be that the researcher has existing experimental paradigms and wants to validate or extend these using biometric data.
Moreover, the study design may be so complex in nature that it is more efficient to use another presentation tool or that the study flow changes on the fly based on the psychophysiological response of the respondent, known as biofeedback, or interactions with the stimuli.
External stimulus presentation tools
In experimental psychology, different dedicated stimuli presentation tools are often used in academic research. One of the most popular tools used in numerous publications is e-prime. Its graphical user interface allows users to design studies as well as give them the option to do inline scripting.
Users can also create very sophisticated study designs. Other stimulus presentation tools such as Psychtoolbox, PsychoPy, and Presentation are also used but in these programs, the user must have coding experience to use those options even though a tool like OpenSesame offers a graphical user interface as an overlay to PsycoPy.
How are these tools integrated into iMotions?
The iMotions software suite allows you to record the screen of the PC on which the software is running, which is called a screen recording. The great benefit of this is that the software allows you to record data from respondents interacting with any third-party application or interface running on the PC. In this case, iMotions will still keep the biometric data in synchrony with the screen recording and thus you will be able to see what the GSR response was or whether or not a respondent showed a specific facial expression at a given point in time.
A thing that is important to remember, is that iMotions doesn’t have information about what was being presented on the screen as such. Therefore, the first post-processing step should be to use our annotation tool to mark up sections of interest and then extract relevant metrics for those segments of interest.
If your recordings are relatively short in duration and you are dealing with only a few respondents it might be feasible to do this manually, but if you have many respondents and stimuli, manually segmenting the data can be labor-intensive and prone to human error.
Luckily, iMotions API can assist you by automating the segmentation so that extracting your collected data becomes much easier. I will go in-depth and provide you with a few examples of utilizing our API in the next section. In the Customer Success Team, we understand that using our API might be challenging at first, which is why we include consultancy in the customer success program for academic users to help you get the best start possible.
Using iMotions API with external stimulus presentation tools
Structurally, it is possible to send two types of triggers/markers to iMotions through the event receiving API. The first option is to use a point/discrete marker that creates a single marker at a specific point in time on your iMotions data. If you just want to know when something happened this might be a good option. However, I personally prefer the more sophisticated range/scene marker function when interacting with third-party applications.
The scene marker marks a whole section of data as belonging to a specific condition or stimulus and that comes in very handy when you are working with eye-tracking for example. If you remember from the previous section, what iMotions does is record the experiment through a screen recording – or. the parent stimulus. The scene marker creates scenes from the parent recording by splitting them into smaller sections.
A scene can be a video recording that contains only the data defined by the range marker. This is useful when the stimulus is dynamic e.i. objects move on the screen. Once a video scene has been generated, you can use our AOI editor to draw dynamic AOIs for only a particular scene or extract GSR peaks from that period of time.
A scene can also be static. If the content on the screen does not change from the start to the end of the range marker, iMotions can take a snapshot of the screen when the start marker was received and then assign all the data within the range marker to that snapshot.
The benefit is that then it becomes possible for you to work with static AOIs in the AOI editor. This is because the snapshot is treated as an image stimulus in iMotions. As more respondents are added to the study the AOI data will automatically update without you having to do any manual work with the data. I will show a few examples of this in the next section.
Coding your experiment
This section is going to be a bit nerdy, but on the other hand, it’s important for me to provide a few tips and tricks and some sample code to help you get started. Once you get a hang of the basics you can start thinking about using our remote control API to start and stop the data recording from the external program. First, however, let us focus on the basics.
The iMotions API uses TCP/UDP in order to receive markers from an external program. All of the aforementioned programs can communicate via these protocols once you set them up correctly. I will focus on using the range marker since this is very useful when dealing with eye-tracking data.
E-prime
Interfacing e-prime with iMotions is straightforward. However, you need to be aware of the fact that e-prime by default presents stimuli with a screen resolution of 640×480. In order for it to work with iMotions, you will need to change the display settings. iMotions uses the screen settings defined by windows so you will need to match the resolution in e-prime to the same as windows. Once that is done, add a socket to your experiment like this:
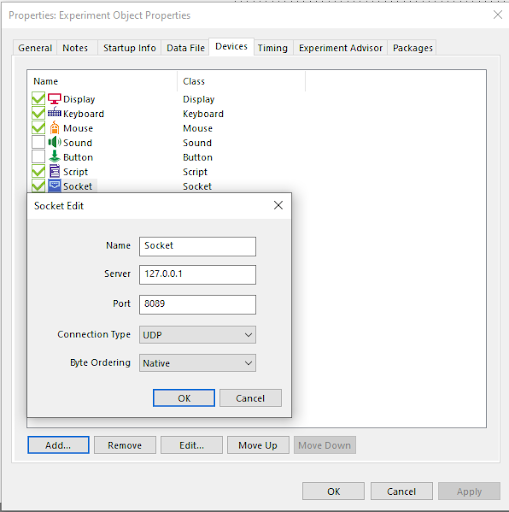
Once this is done you can send range markers from a StimDisplay object like this:
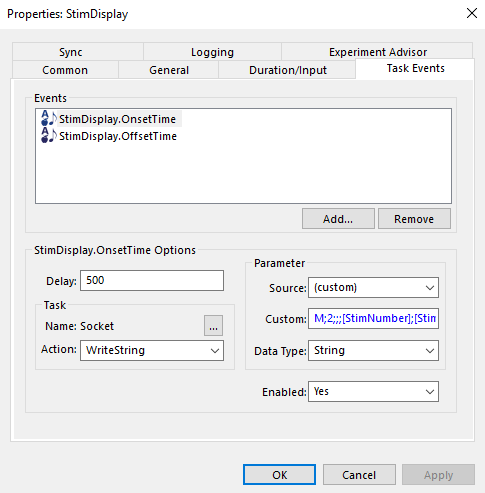
In this example I’m telling iMotions to start the range marker at the onset time of the stimDisplay with this string: M;2;;;[StimNumber];;S;I\r\n
The offset is sending the string: M;2;;;[StimNumber];;E;\r\n, where the “E” ends the range.
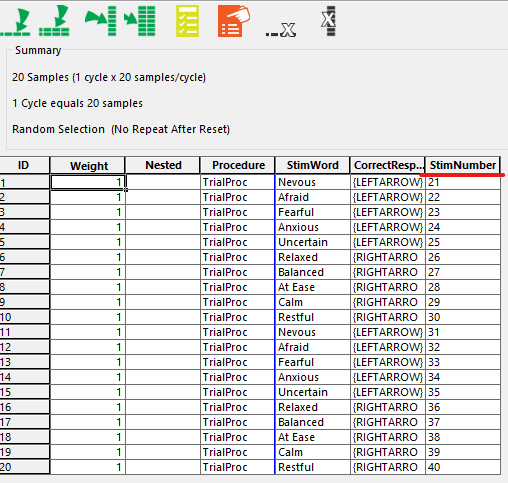
I use square brackets [StimNumber] to name the range marker in iMotions based on a variable in my list. Ideally, this should be unique for every display. If not, multiple samples from e-prime will be added to the same image scene in iMotions. The “S” denotes the start of the range marker and “I” denotes the creation of an image scene. Note that in my experiment I have a pre-release of 500 ms. on the stimulus – so I have to add that to the marker as a delay.
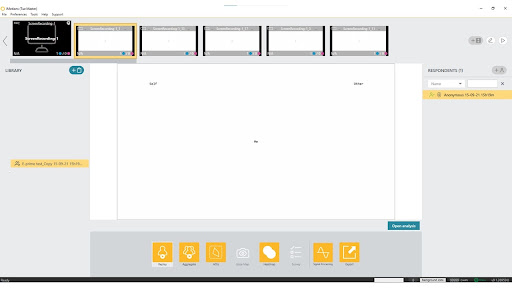
When I run the study inside iMotions it looks like this. You see the original screen-recording in black and then the scenes generated by the marker representing each trial as a thumbnail child of the parent recording.
Psychtoolbox
Psychtoolbox is a stimulus presentation tool using Matlab as the backbone. Experiments have to be scripted, but some very useful demos are provided to get you started. Matlab has inbuilt functions for creating network sockets, very much like e-prime, and we can use those to send API range markers:
TCP:
Message_start = ‘M;2;;;[StimNumber];;S;I\r\n’ ;
IP = ‘127.0.0.1’; % IP, % Usually localhost
TCP_events = tcpclient(IP,8089); % The socket
toiM = unicode2native(sprintf(Message_start), ‘UTF-8’); % To native byte ordering
write(TCP_events, toiM); %writing data to iMotions API
UDP:
Message_start = ‘M;2;;;[StimNumber];;S;I’ ;
u = udpport(“IPV4”); % create UDP object
configureTerminator(u,”CR/LF”); % specify line terminator
writeline(u,Message_start,”127.0.0.1″,8089); %writing data to iMotions API
And then sending the stop command at some point later in a similar fashion as shown above for the e-prime example.
PsychoPy and OpenSesame
OpenSesame is basically a graphical overlay to PsychoPy and therefore the coding principles are the same. I will use a few screenshots from OpenSesame to illustrate how to create range markers from Python. OpenSesame’s user forum has a detailed discussion about how to use it with iMotions, see: https://forum.cogsci.nl/discussion/1822/unicodeencodeerror-after-using-ue-in-loop-variable
In Python, you can easily create network sockets. In my example here, I have created two definitions.
Setting up a UDP connection and sending the message
import socket
### Some global settings/variables used
lnbr = ‘\r\n’
IP = “127.0.0.1”
UDP_PORT = 8089 # iMotions external API
# iMotions parameters
# send external API message (mouseEvent or slideChangeEvent)
def sendudp(message):
sock=socket.socket(socket.AF_INET,socket.SOCK_DGRAM)
sock.sendto(bytes(message,”utf-8″),(IP,UDP_PORT))
log.write(‘ExtAPI message sent: ‘ + message)
You can then call the “sendudp” every time you want to send the range marker start/end to iMotions
For ease of use, I have created another definition that generates the string message that is sent to iMotions. In this way, the only thing I need to change is the slideID, the unique stimulus identifier. Note that in this example I am using “N” and not “S” for start or “E” for end to define the range marker. The “N” marks the start of the next segment, and automatically ends the previous range marker. This is useful when stimuli are occurring right after each other so you want a new segment to start right after the previous segment.
def slideChangeEvent(slideID):
# discrete header
# version 2
header = ‘M;2;’
# field 5: slideID
# field 7: marker type N
# (marks the start of the next segment, automatically closing any currently
# open segment.)
event = ‘;;’ + slideID + ‘;;N;I’
return header + event + lnbr
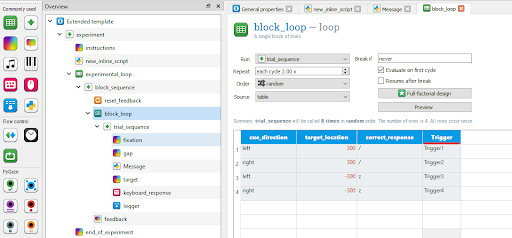
Once I have created this I can easily send a message to iMotions, each time I present a new slide. In OpenSesame it looks like this, where I run an inline script every time I show a new stimulus. The definitions are defined in the inline script at the beginning of the experiment.
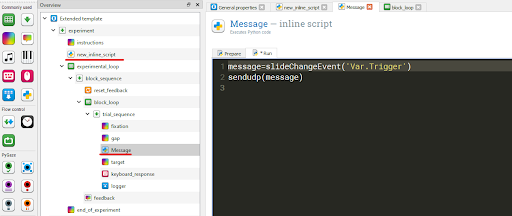
The ‘Var.Trigger’ is similar to the square brackets I used in e-prime. I’m defining the name of the stimulus based on a variable defined in the block_loop table:
What do I do if my stimulus presentation software cannot communicate with iMotions API?
If your stimulus presentation software does not allow you to send commands to iMotions API we do have features in the software that allows you to generate scenes based on a post imported CSV file. The prerequisite of this is that the external presentation software is capable of logging the UNIX timestamp of the events that occurred /the stimuli it showed. We have a solution in place for z-Tree used frequently in economic studies. The same solution can be used for Inquisit, which is another stimulus presentation engine.
Summary
Whatever the stimulus presentation tool is that you use to accomplish your research, it can be integrated into the iMotions software suite with a little work. The guiding philosophy behind the iMotions Software Suite is that it is usable with other software applications as well as making the software customizable in itself. That is why we decided to use R-Notebooks as an integral part of the data analysis process, and it is also why we have made sure that our software integrates with as many external stimuli presentation programs as possible.
So, whether you do your stimuli presentations and visualizations entirely in iMotions, or in any of the external programs available, the iMotions Software Suite can accommodate your studies and experiments. If you are unsure how to use iMotions in conjunction with 3rd party software, or if you need help with your experiments and studies using iMotions, our Customer Success Managers are ready to help and consult with you on the next step in your research.
Let’s talk!
Schedule a free demo or get a quote to discover how our software and hardware solutions can support your research.


